Vivien’s Virtual View features an integrated platform for virtual reality experience.
In this section
Using Virtual Reality in Virtual View
In Vivien’s Virtual View you can immerse in the virtual reality feature to view and experience your event design in virtual reality mode.
The Virtual Reality feature in Vivien is available to anyone who has the VIVE VR or OCULUS RIFT hardware system installed, connected and fully operational with the SteamVR application.
Follow these instructions before you begin:
1Ensure that your computer meets the minimum VIVE VR or Oculus Rift specifications.
2Ensure that the VIVE VR or Oculus Rift system components are installed, connected, and working correctly.
3Ensure that you have SteamVR installed and when you start it, all of the VR hardware is detected (headset, Controllers and Base Stations).
4Ensure that you have installed Vivien 2021.
To start and end the VR feature in Vivien
1In Vivien, switch to Virtual View tab.
2To start VR Mode, right-click on the Virtual View and choose the Start VR Mode menu. The Start VR Mode will appear on the menu list if SteamVR has detected all VR hardware, and your system meets the system requirements.
Tip: You can also press the F10 key to start VR Mode.
Note: While VR Mode is enabled, Vivien’s Virtual View will display on the screen what the headset is showing in the VR headset.
3To exit VR Mode, right-click on the Virtual View and choose the Stop VR Mode menu.
Tip: You can also press the F10 or ESC keys to exit VR Mode.
To use the camera controls on VIVE VR Controllers
The camera controllers are used to interact with objects in Virtual View, and access system controls.
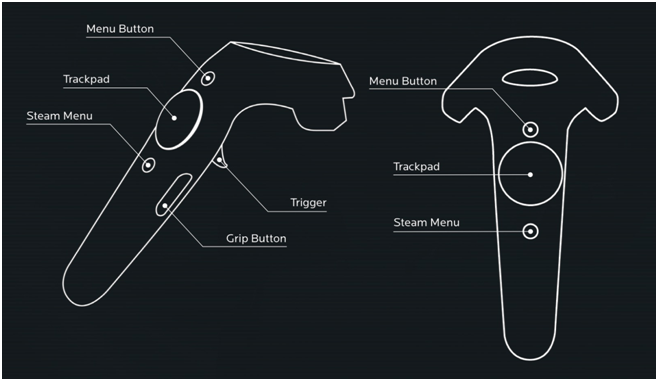
Vive VR Right Controller
nShow Map: Press this button to show the scaled mini map of your drawing. You can adjust the scale size of the map on the control menu that opens from the Left Controller.
nTrackpad on the Right Controller: Use the Trackpad for moving around.
nMove Forward: Press to move forward.
nMove Backward: Press to move backward.
nMove Left: Press to move towards the left side.
nMove Right: Press to move towards the right side.
nMove Down: Press the Grip Button on the Right Controller to descend downwards.
nGesture Rotate/Altitude: Press and hold the Trigger button and use your hand gestures to pivot left or right on a horizontal axis, and elevate upwards or descend downwards on a vertical plane. Guide arrows appear when you press the Trigger button.
Vive VR Left Controller
nShow Menu: Press this button to show the control menu settings window. This helps you familiarize with control options.
nUse the Trigger button to actuate and exit control menu options.
nUse the Trackpad to navigate and adjust the menu option values.
nTrackpad on the Left Controller:
nRotate Left: Use to pivot around your current position towards the left side.
nRotate Right: Use to pivot around your current position towards the right side.
nTeleport More: Press to increase the distance of the dashed teleport arc, and then press the Trigger button to apply. The teleport arc shows you where you would be teleported to in the space.
nTeleport Less: Press to decrease the distance of the dashed teleport arc, and then press the Trigger button to apply. The teleport arc shows you where you would be teleported to in the space.
Teleport to Camera: You can point to a camera object and teleport to move to the selected camera position and automatically orientate to the camera’s POV if the menu is set to Teleport. You will move the selected camera position, but will not orientate to the camera’s POV if the menu is set to Smooth Teleport.
Note: Teleport to Camera is available if Camera Models and Camera Tips are enabled in View Options.
nMove Up: Press Grip Button on the Left Controller to elevate upwards.
On the VIVE VR, when the button labels are displayed, the Controllers will display the following information in the virtual space.

To use camera controls on OCULUS RIFT Controllers
The camera controls are used to interact with objects in the Virtual View, and access system controls.
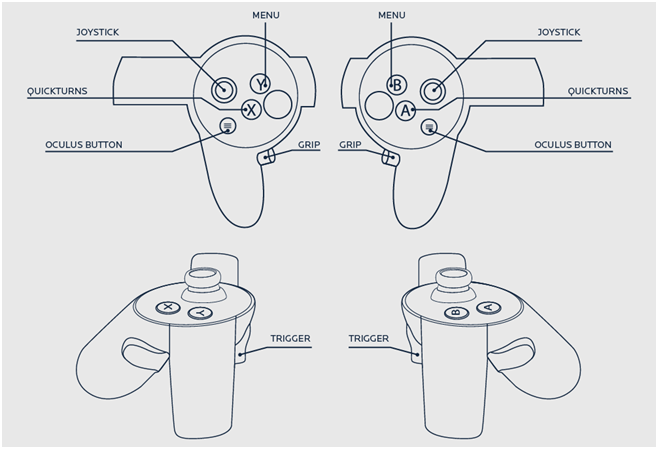
Oculus Rift Right Controller
nShow Map: Press this button to show the scaled map of your drawing. You can adjust the scale size of the map on the control menu that opens from the Left Controller.
nJoystick on the Right Controller: Use the Joystick for moving around.
nMove Forward: Push forward to move forward.
nMove Backward: Push backwards to move backward.
nMove Left: Push left to move towards the left side.
nMove Right: Push right to move towards the right side.
nMove Down: Press Grip Button on the Right Controller to descend downwards.
nGesture Rotate/Altitude: Press and hold the Trigger button and use your hand gesture to pivot left or right on a horizontal axis, and elevate upwards or descend downwards on a vertical plane. Guide arrows appear when you press the Trigger button.
Oculus Rift Left Controller
nShow Menu: Press this button to show the control menu settings window. This helps you familiarize with the control options.
nUse the Trigger button to actuate and exit control menu options.
nUse the Joystick to navigate and adjust the menu options.
nJoystick on the Left Controller:
nRotate Left: Push left to pivot around your current position towards the left side.
nRotate Right: Push right to pivot around your current position towards the right side.
nTeleport More: Push forward to increase the distance of the dashed teleport arc, and then press the Trigger button to apply. The teleport arc shows you where you would be teleported to in the space.
nTeleport Less: Push backward to decrease the distance of the dashed teleport arc, and then press the Trigger button to apply. The teleport arc shows you where you would be teleported to in the space.
Teleport to Camera: You can point to a camera object and teleport to move to the selected camera position and automatically orientate to the camera’s POV if the menu is set to Teleport. You will move to the selected camera position, but will not orientate to the camera’s POV if the menu is set to Smooth Teleport.
Note: Teleport to Camera is available if Camera Models and Camera Tips are enabled in View Options.
nMove Up: Press Grip Button on the Left Controller to elevate upwards.
On the OCULUS RIFT, when the button labels are displayed, the Controllers’ will display the following information in the virtual space.

The VR GUI and its menus offer the ability to select predefined shortcuts (e.g. Looks, Cameras, Camera Paths, Scenes), or Properties (e.g. Virtual View Properties) while viewing your show in VR.
To use the VR menus
1Press the Show Menu button on the Left Controller of either VIVE VR or OCULUS RIFT to display the VR GUI.
2Use the Trackpad or Joystick to navigate the menu options.
nLooks: A carousel of Looks saved in the file will be visible for selection.
a.Select the Look menu to display a carousel of Looks that were saved in the file.
b.Use the Left and Right controls on the Left Controller to select the Look.
c.Use the Trigger button to actuate the Look.
Result: Vivien will update the current Look in your Virtual View.
nCameras: A carousel of Cameras created and available in the file will be displayed for selection.
a.Select the Cameras menu to display a carousel of Cameras that were created and available in the file.
b.Use the Left and Right controls on the Left Controller to select.
c.Use the Trigger button to actuate the Camera.
Result: Vivien will update the current view to the Camera selected.
nCamera Paths: A carousel of Camera Paths created and available in the file will be displayed for selection.
a.Select the Camera Paths menu to display a carousel of Camera Paths that were created and available in the file.
b.Use the Left and Right controls on the Left Controller to select.
c.Use the Trigger button to actuate the Camera Path.
Result: Vivien will update and apply the Camera Path to the current view.
nScenes: A carousel of Scenes saved in the file will be displayed for selection.
a.Select the Scene menu to display a carousel of Scenes that were saved in the file.
b.Use the Left and Right controls on the Left Controller to select.
c.Use the Trigger button to actuate the Look.
Result: Vivien will update the current Scene in your Virtual View.
nView Options: Virtual View properties are displayed and available for changes.
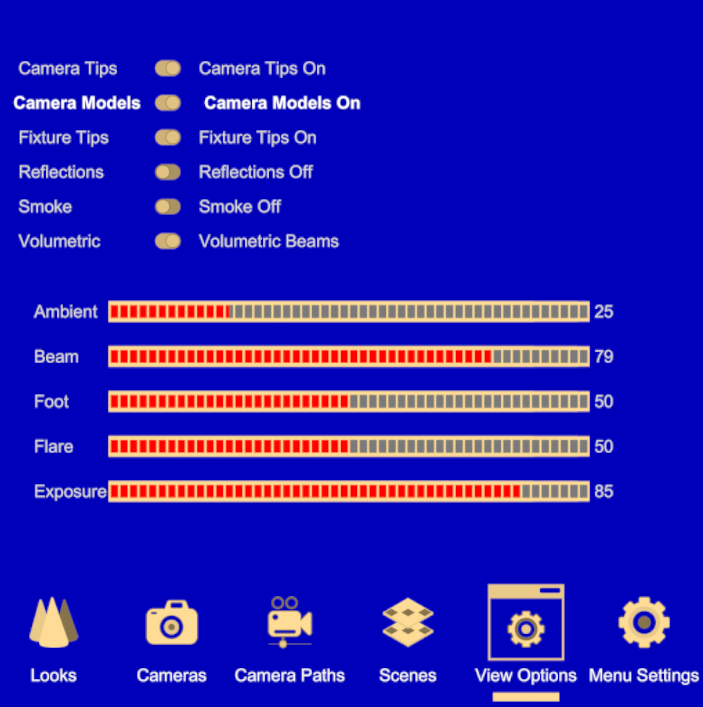
nCamera Tips: Show camera information when your cursor hovers over it in VR.
nCamera Models: Show camera objects in VR.
nFixture Tips: Show fixture information when your cursor hovers over it in VR.
nReflections: Show material reflections on objects in VR.
nSmoke: Show atmospheric smoke effects on beams in VR.
nVolumetric: Show higher quality visualization of beams in VR.
nAmbient: Adjust the ambient light contribution from localized geometric visibility.
nBeam: Adjust the brightness of the fixture beam cones.
nFoot: Adjust the brightness of the fixture beam footprints.
nFlare: Adjust the brightness of the fixture lens flares.
nExposure: Adjust the overall exposure of fixture beams.
a.In the View Options page, use the Trigger button to enter.
b.Use Up and Down to select the option you wish to adjust. The option will be highlighted.
c.Use Left and Right to change the property value of the selected option.
d.Use the Trigger button to actuate/save the property changes.
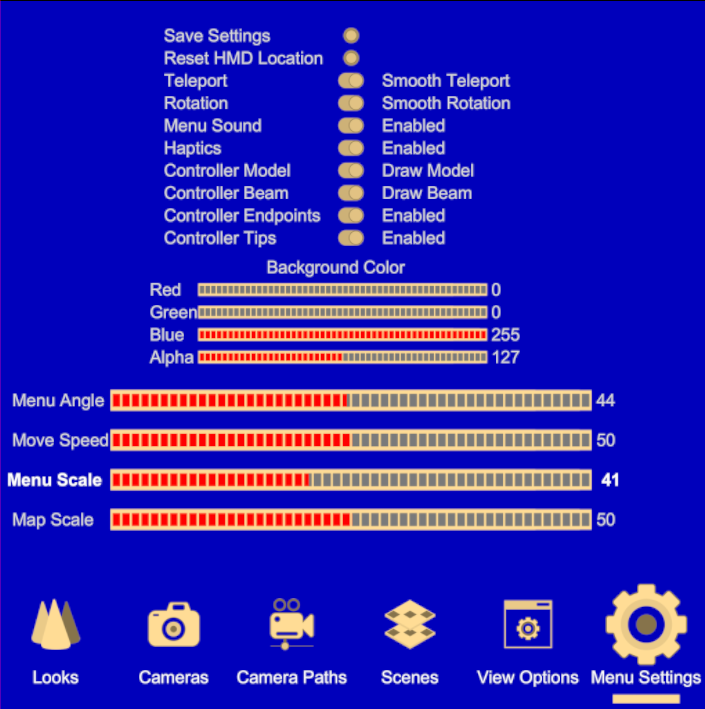
nMenu Settings: Adjust how the menu page and virtual graphic user interface display and interact in the virtual space.
In Menu Settings, you can change the following settings:
nSave Settings: Preserve the current settings.
nReset HMD Location: Reset the controller and display orientation.
nTeleport - Smooth Teleport: Show smooth teleport or instant teleport. Note: Teleport to Camera positions: Teleport: You will move instantly to the selected camera position and automatically orientate to the camera’s POV, if the menu is set to Teleport. Smooth Teleport: You will move to the selected camera position, but will not orientate to the camera’s POV.
nRotation - Smooth Rotation: Show smooth rotation or instant rotation.
nMenu Sound - Enabled: Activate sound when navigating the menu settings.
nHaptics Enabled: Activate tactile sensation with VR space interaction and controls.
nController Model - Draw Model: Show the controller model object in VR.
nController Beam - Draw Beam: Show beams and distances from the controller in VR.
nController Endpoints - Enabled: Show dots as guide markers for controllers in VR.
nController Tips - Enabled: Show controller labels in VR.
nBackground Color: Adjust Red, Green, Blue and Alpha levels.
nMenu Angle: Adjust how the Menu page is angled in VR.
nMove Speed: Adjust the speed when moving and rotating in VR.
nMenus Scale: Adjust the size of the Menu page in VR.
nMap Scale: Adjust the size of the Mini Map of your drawing in VR.
a.In the Menu Settings page, use the Trigger to enter.
b.Use Up and Down to select the option you wish to adjust. The option will be highlighted.
c.Use Left and Right to change the property value of the selected option.
d.Use the Trigger button to actuate/save the property changes.
You can access the VR Menu directly inside Vivien on your PC and control some VR features on behalf of the person experiencing it. In VR Companion Mode, you can change Cameras, Camera Paths, Looks, Scenes, and other VR Environment settings.
To use VR Companion Mode
1In Vivien, switch to Virtual View.
2Start VR Mode, right-click on the Virtual View and choose the Start VR Mode menu. The Start VR Mode will appear on the menu list if SteamVR has detected all VR hardware, and your system meets the system requirements.
Tip: You can also press F10 on your keyboard to start VR Mode.
Result: Vivien’s Virtual View shows what appears in the VR headset.
3On your keyboard numpad, press Enter key to launch VR Companion Mode.
Result: The VR Menu Settings window appears on your screen and you have direct access to the menu settings from your PC.
4Use your numpad keys to navigate and actuate menu settings.
nUse the Up or Down arrows (8 or 2 keys) to navigate and select the menu options in View Options and Menu Settings.
nUse the Left or Right arrows (4 or 6) to toggle the menu options and increase/decrease levels in View Options and Menu Settings.
nUse the Left or Right arrows (4 or 6) to navigate between the Menus: Looks, Cameras, Camera Paths, Scenes, View Options, Menu Settings.
nUse 5 key to select and actuate a Look, Camera, Camera Path, or Scene from their respective Menus (5 key is equivalent to the trigger button).
nUse 5 key to navigate between Menu Settings or View Options buttons and the previous menu option selected.
5On your keyboard numpad, press Enter again to close the Menu Settings window and exit VR Companion Mode.