
Virtual
view output
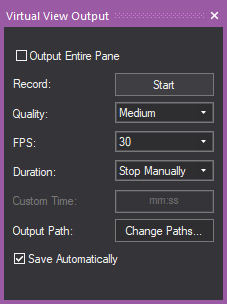
The Virtual View Output tool
is a feature that allows you to record and save the current Virtual View
as a video file (.mp4). All events that occur in the current Virtual View
will record continuously in real-time until recording is stopped or you
switch to a different tab.
In the Virtual View
Output tool window, you can:
- Start and stop the recording of your current Virtual
View on the Virtual View Recording section.
- Change the settings of the Virtual
View Recording section.
The settings available in the Virtual
View Output tool are:
- Output Entire Pane:
Select this checkbox to output or record everything that is displayed
in the Virtual View, which includes the Virtual View and all the view
options enabled (Gyroscope, View Statistics, Simulation Information,
Visual References, etc.).
- Record: Click Start or Stop
to begin or end Virtual View Recording.
- Quality: Select Low, Medium, or
High from the drop-down menu to set
the bitrate of recorded outputs. Bitrate corresponds to the video
quality and the video file size. In general, a higher bitrate provides
higher image quality and requires more bandwidth in the video output.
- FPS: Select the frame
rate (frames per second) from the drop-down menu. The default frame
rate is 30.
- Duration: Select the
automatic length of recording time, or select to stop the recording
manually, or set a custom length of recording time.
- Custom Time: Type
the duration for the recording if you selected Custom from
Duration drop-down
menu.
- Output Path: Click
Change Paths if you want to specify
different locations for the video clips you recorded.
Note: The
Application Options window appears where
you can browse and specify your locations in Temp
Location and File Location on
the Virtual View Recordings section.
- Save Automatically:
Select this checkbox to automatically save the Virtual View Recordings
in the default file locations. Clear this checkbox to browse and save
the video clip in your specified location.
To start/stop virtual view recording
- In Lighting Quad or Virtual View
tab, click on the Virtual View.
- From the menu,
choose .
Tip: You may click the Virtual
View Output tab on the side of the Vivien application window
or use the keyboard shortcut CTRL + ALT + O.
By default, Virtual View Output window
is set to .
Result: The Virtual View Output
window appears.
- On the Virtual View Recording section,
click Record: Start to begin recording.
Tip: You may right-click on the Virtual View and
choose from the menu
that appears, or use the keyboard shortcut CTRL
+ SPACEBAR to start recording.
Result:
- Real-time recording of all events that occur
in Virtual View begins.
- Text prompt of the recording time in red font
appears on the grey bar across the top of the Virtual View pane to
indicate the actual recording in minutes and seconds.
- In the Virtual View Output window,
the Master: Stop All Outputs button
is active.
- Click Record: Stop
to end the recording.
Tip: You may right-click on the Virtual View and
choose from the menu
that appears, or use the keyboard shortcut CTRL
+ SPACEBAR again to stop recording, or you may click Master: Stop All Outputs to end all Virtual
View Output recordings.
Result: The recording ends, the video file is complete
and saved in the set location.
Virtual view output for pop-up windows
The Start button
on the Virtual
View Recording section of the Virtual
View Output tool does not apply to the Virtual View on a pop-up
window. Instead, you may use the right-click menu or the keyboard shortcuts
to record the Virtual View Output.
To start/stop recording of virtual view pop-up window
- Open a pop-up window of your Virtual View.
- Right-click on your Virtual View pop-up window
and choose from the
menu that appears.
Result:
- Real-time recording of all events that occur in
Virtual View begins.
- The text prompt Recording appears
on the grey bar across the top of the Virtual View pop-up window to
indicate the actual recording in progress.
- Right-click on the Virtual View pop-up window
and choose from the
menu that appears.
Tip: You may use the keyboard shortcut CTRL
+ SPACEBAR to start and stop
recording.