
Exporting images from Virtual
View
When you have arranged a viewpoint in the
Virtual View that you want to show to your client, you can export the
image as a graphic file.
You can also export the multiple viewpoints
from all Standard Cameras in Virtual View at once.
To export virtual view images
- In the Virtual View tab,
right-click on the image and select .
Result: The Virtual View Image
Export window appears.
Note: If
World Camera is
the only Camera in this Vivien file, the Export Images
from all Camera (to PNG files) checkbox in the Batch
Export section is disabled, skip Step
2 and proceed to Step 3
of this procedure section.
- In the Batch Export
section, select the Export Images from all Camera
(to PNG files) checkbox if you want to export the viewpoints
from all Standard Cameras.
Result: The
Batch Export options are enabled for selection.
Batch Export
- Export Images from all Camera
(to PNG files): Select this checkbox to export in batches the
multiple views from all the Standard Cameras in Virtual View to image
files in PNG format that are saved in your computer.
Selecting this checkbox enables the Batch
Export options. If this checkbox is selected, but no other options
in this section are selected, the images will save in the default Images
folder.
- Image Files' Names:
Type or paste the name for the exported image files in this field,
or you may type Smart Variables. This field will be auto-populated
with any data that exists in the Application
Options > File Options >
Virtual View Export Options field followed
by a space, followed by a dash, followed by another space, followed
by the %Camera% Smart Variable.
This field will be auto-populated with %Camera%
Smart Variable if the Virtual View Export Options
field is empty. See Virtual_View_Export_Options
in Application_Options
for additional details.
- Insert Smart Variable:
Click the + button beside the Image
Files' Names field to open the Smart Variables
window, from where you can insert any Smart Variable at the cursor's
current location in the field. If multiple smart variables are required,
keep clicking this button (or type manually if known by heart).
Tip: Don't
forget to add spaces, dashes, etc., as needed, between the inserted Smart
Variables.
- Append name of current Look
to filename: Select this checkbox to add the name of the current
Look at the end of the exported images' filenames.
- Append date and timestamp
to filename: Select this checkbox to add the current date and
time at the end of the exported images' filenames.
- Place images into new folder:
Select this checkbox to save the exported images in a new folder.
Type or paste the name for the new folder into this field, or type
Smart Variables.
- Insert Smart Variable:
Click the + button beside the Place
images into new folder field to open the Smart
Variables window, from where you can insert any Smart Variable
at the cursor's current location in the field. If multiple smart variables
are required, keep clicking this button.
- In the Image Dimensions
section, use the appropriate boxes to adjust the width and height
of the image. The values that appear when this window opens match
the Virtual View's current resolution. You may enter higher or lower
values (for example 1920 and 1080 respectively, or 1280 and 720, or
2560 and 1440, etc.) for the desired resolution.
- Select the Lock Aspect Ratio checkbox
to lock the aspect ratio of the image. Type the new value in the Aspect Ratio box to change the aspect ratio.
Note: It
is normal for the Lock Aspect Ratio checkbox
to be disabled every time this dialog box opens. While all the other options
in this dialog box are retained, Lock Aspect Ratio
is not because it would result in an incorrect export after a Camera object's
Aspect Ratio was changed between the time this dialog box was previously
opened and now.
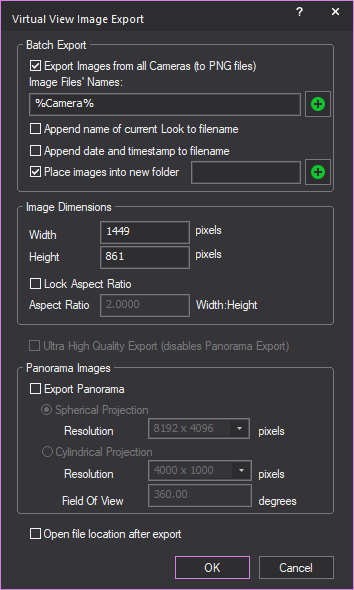
- Vivien enables the Ultra
High Quality Export checkbox if an 8GB (or more) graphics
card is detected.
Select the Ultra High
Quality Export checkbox to export the Virtual View to a higher
fidelity image (with better defined and crisper beams, less aliasing on
shadows, etc.) than what appears in the Virtual View itself. See below
the image comparison between Ultra High Quality Image Export and High
High Quality Export.
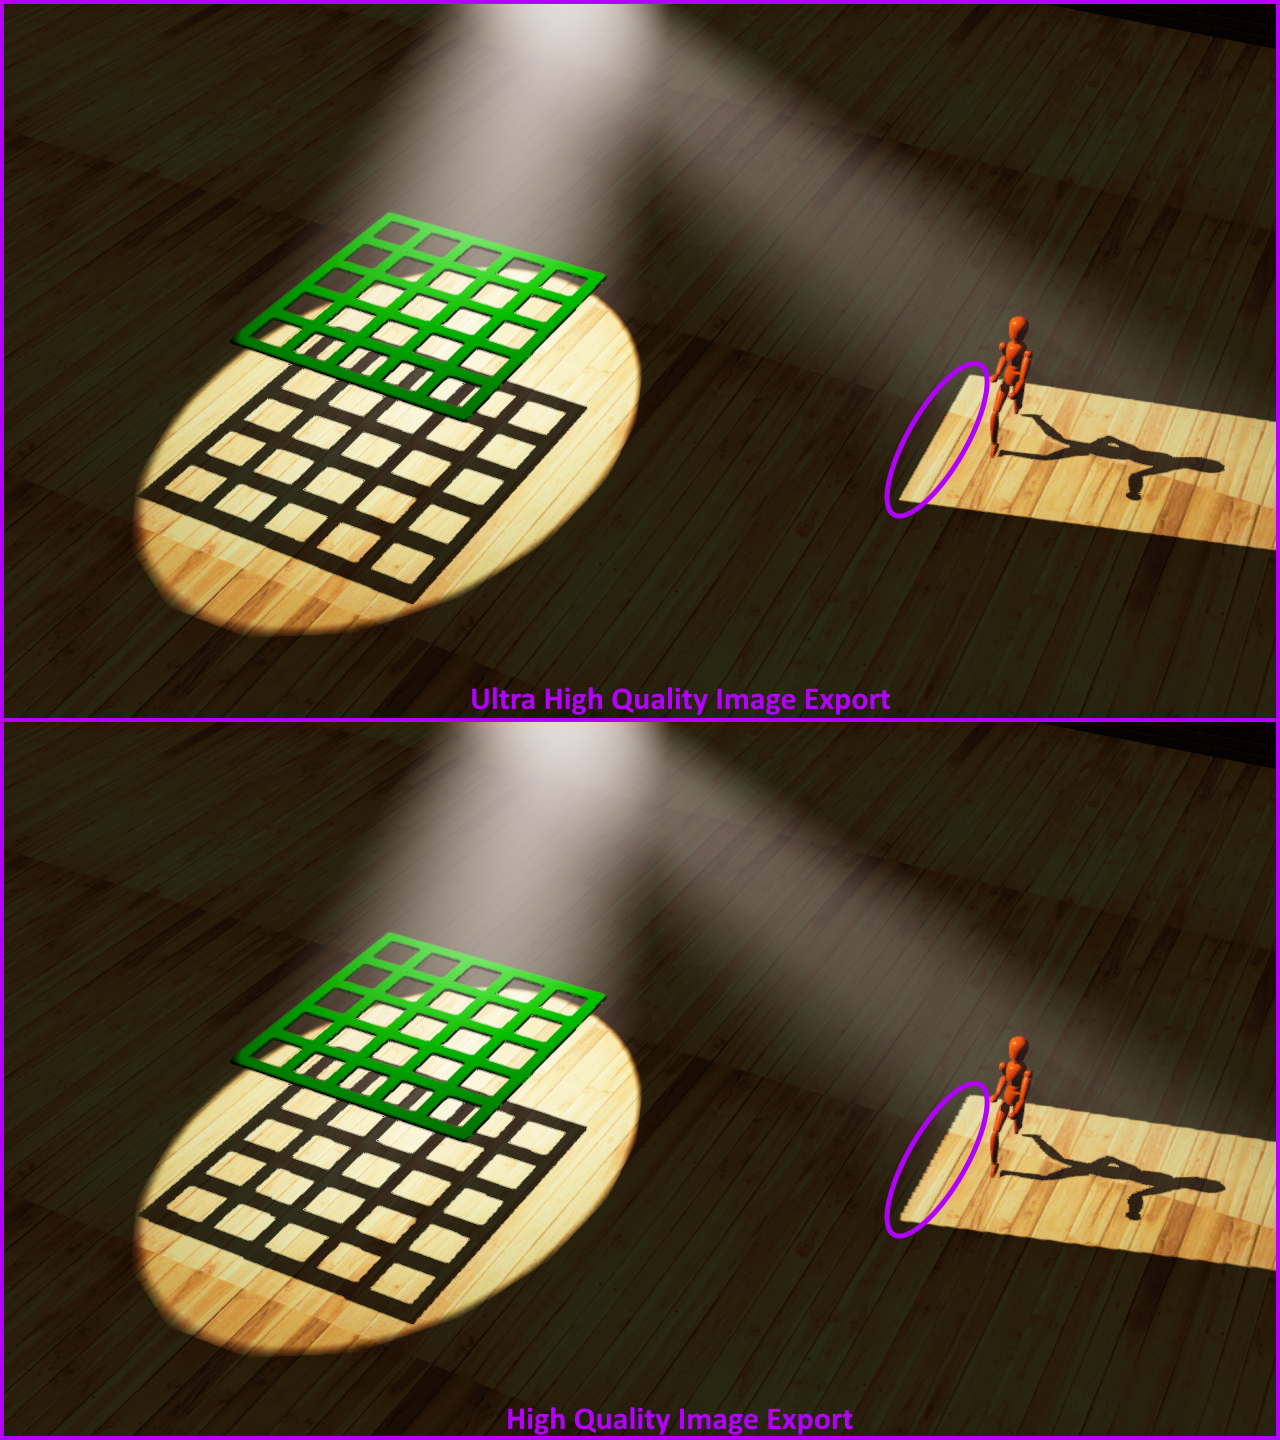
Note: Selecting the Ultra High
Quality Export checkbox disables the Export
Panorama option.
- In the Panorama Images section,
select the Export Panorama checkbox
to export a panoramic image or images of your Virtual View, enable,
and select the projection options.
Result:
The Panorama
Images options are enabled for selection.
Notes:
- The maximum resolution for a panoramic export
is 8192 x 4096 if Vivien detects the user’s computer video card has
enough video memory to support a large panorama image. Regardless
of how much Video Memory is available, it is not possible to export
Ultra High Panorama images.
- Export Panorama is
disabled if the Sketch option is enabled
in the View Styles section of
View Options > General tab.
Panorama Images: Optional parameters
in this section apply to a single image export and all images exported
in batch.
- Spherical Projection:
Select this checkbox to export the panoramic image as a spherical
image showing up to a full 360 degrees camera view that includes top
and bottom.
- Cylindrical Projection:
Select this checkbox to export the panoramic image as a cylindrical
image showing up to a full 360 degrees camera view of the sides only.
- Resolution: Select
the image display quality in pixels from the Resolution
drop-down list of the selected option.
- Field Of View: In
this box, type the maximum panoramic angle for the image.
- Select the Open file location
after export checkbox to open the folder where exported
image file(s) were saved after export is complete.
- Click OK.
Result: The
Save As browser window appears. All the applied
settings in the Virtual View Image Export
window are saved upon exit and appear the same when the window opens again.
- If you are exporting in batch, select the folder
location where you want to save the files,
or
select a file name, location, and file type if you
are exporting a single image.
- Click Save.
Result:
Image(s) from each camera view conform to all parameters set in the Virtual View Image Export window, export, and
save in the selected folder.
Notes:
- If no other options are selected for batch image
exports, the filenames of the resulting images are the names of the
cameras in the file; these files will only save in PNG format but
may be converted to other formats using an external image converter.
- The next time it opens, the Save
As browser window will always open to the folder location where
the last image(s) was (were) saved.
- The file name template specified in Virtual
View Export Options in the File Options tab
of the Application Options window
does not apply to batch image exports (only to single image exports).