
Merging documents
Use the
command to combine multiple event
documents into one. You can also merge all file types that can be opened
directly by Vivien. You can merge an existing Vivien document with any
of the following types of documents:
- Other Vivien documents
- Vivien documents
- DWG/DXF files
- SketchUp files
- Wavefront files
- Collada files
- Filmbox files
- 3D Studio files
To merge documents
- Open or create the destination Vivien document.
- From the menu,
choose .
- In the browser window that opens, choose the file
that you would like to merge into the destination document.
Tip: In the File Type box,
select the file type to display only files of this type in the browser
window.
- Click Open.
Result: The Merge dialog
box opens.
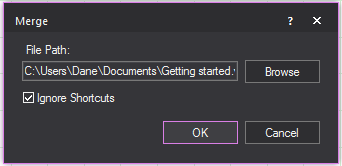
- To include all the shortcuts from the original
files into the merged file, clear the Ignore
Shortcuts checkbox. Otherwise, keep the checkbox selected and
all shortcuts will be lost when the files merge.
- Click OK.
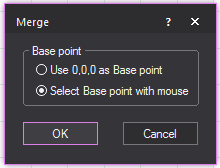
- Select the base point (the point to be used as
the starting point for the merge):
- To align the incoming drawing at 0,0,0 with the
existing drawing, select Use 0,0,0 as Base point.
- To use the mouse to select the basepoint for
the merge of CAD drawings, select Select Base
point with mouse.
- Click OK.
Result: The Layer Import window appears.
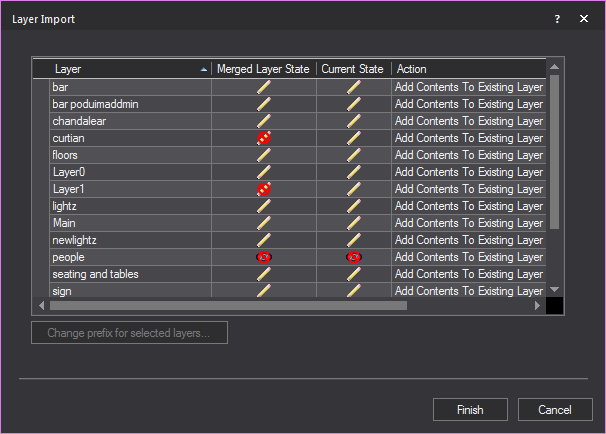
Tip: It is typically sufficient to accept these
settings and click Finish. This dialog shows
you which layers don't already exist and will be added, and which already
exist and will have objects merged into them. By using the drop-downs
in the Action column, you can rename layers
instead of merging objects to your existing layers, which can help keep
your file clean.
- Click Finish.
Note: If you chose to select the basepoint using
your mouse in step 5, you must click in the document or enter the coordinates
to set the basepoint.
Merging
a DWG/DXF document
To
merge a DWG/DXF document
This procedure inserts the imported DWG/DXF
file into an existing Vivien document in the location of your choice.
At a certain point, the merging procedure
is the same as the opening procedure until the end where you choose where
to place the object you are merging.
- From the menu,
choose .
- Click Browse to
locate the DWG or DXF file on your computer.
- In the Merge window
that appears, beside the File name box,
select the DWG or DXF file type from the drop-down list.
- Browse to locate the file, select it, and then
click Open.
Result: The Merge dialog
box appears.

- Select the base point (starting point of the merge):
- To align the incoming drawing at 0,0,0 with the
existing drawing, select Use 0,0,0 as Base point.
- To use the mouse to select the base point for
the merge of wireframe drawings, select Select
Base point with mouse.
- Click OK.
- Follow procedure Steps
4 to 13 of
the “To
open a DWG/DXF document” section. At this point, the
steps are the same as with opening until the end when you choose where
to place the object you are merging.
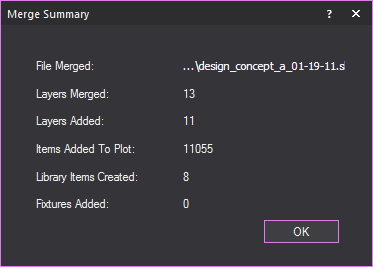
Result: The Merge Summary window
appears.
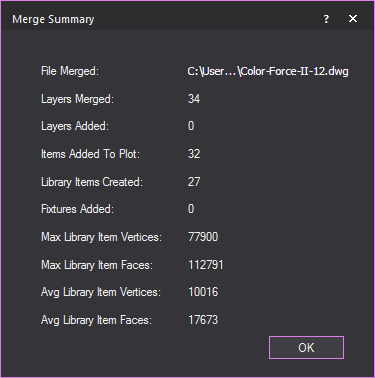
- Click OK.
- If you chose Select Base
point with mouse in Step
5, click to place the object in the drawing.
The CAD Importing Guide
For more detailed information about importing
DWG/DXF files, please read through the CAD Importing Guide, at http://cast-soft.com/wysiwyg/cad-importing-guide/.
Merging a SketchUp file
Merging allows you to add the contents
of a SketchUp file to the contents of the current Vivien document. For
example, if you have a SketchUp object like a piece of furniture that
you would like to merge into your existing Vivien drawing, you could use
the Merge command.
To
merge SketchUp files
This procedure merges the SketchUp file
into the current Vivien document, placing the object in the location you
specify.
At a certain point, the merging procedure
is the same as the opening procedure until the end when you choose where
to place the object you are merging.
Before you begin
You must have the SketchUp file saved on
your computer to begin this procedure.
- Open the Vivien file into which you want to add
the SketchUp file.
- From the menu,
choose .
- Click Browse to
locate the SketchUp file on your computer.
- In the Merge window
that appears, beside the File name box,
select SketchUp Files from the drop-down list.
- Browse to locate the file, select it, and then
click Open.
- Leave Ignore Shortcuts selected,
and then click OK.
Result: The Merge dialog box appears.

- Select one of the options to choose the base point
for the merged object.
- Click OK.
- Follow procedure Steps
3 to 10 from
the “To
open SketchUp files” section. At this point, the steps
are the same until the end when you choose where to place the object
you are merging.
Result: The Merge Summary window appears.
- Click OK.
- If you chose Select Basepoint
with mouse in Step 7,
click to place the object in the drawing.