
You can save your event document as a Vivien file. You can also save an object or group of objects contained within your document as a separate file.
Vivien also allows you to export a Vivien file to a DWG/DXF formatted file. DWG and DXF formats are used to transfer documents to AutoCAD or other compatible drafting applications. For more information, see “Saving event documents as DWG/DXF files”.
The Save command saves the open document to the same file name and location (folder, disk, and so on) as it was previously saved. If the document is being saved for the first time, this command performs the Save As function.
From the File menu, choose Save.
or
Click the Save tool on the Standard toolbar.
 The Save button.
Use the Save As command to save the current document to a new file name, a new file type, or new destination.
You can use this procedure to save the currently selected object to a separate Vivien file.
Result: The Save As dialog box opens.
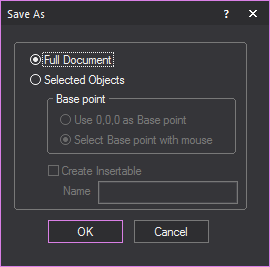
Note: This option is only available if the Selected Objects option was previously chosen.
You can save your event documents so they can be opened in previous versions of Vivien. This can be useful if you want to share your drawings with users who have previous releases of Vivien (2015, 2016, 2017, 2018) installed on their computer.
Note: Vivien cannot save files that are compatible with Vivien 2.0 or earlier.
You can save your event documents to be compatible with the latest WYSIWYG version.
Note: You can open “.vvn” files in WYSIWYG.
If you need to send your Vivien drawings to someone using another drafting program, you can export your file to the DWG or DXF file type. DWG and DXF formats are used to transfer documents to AutoCAD or other compatible drafting applications. For details, see “Exporting DWG/DXF files”.
The Vivien Save As command lists a file type called “.vvt”. Vivien Event Template files are similar to the type of template file you may use on your word processor to set up fax cover sheets, memos, or letters. Once you have drawn your event with everything that is common to all events, save it as a “.vvt” file in the \Templates directory. Each time you start a new event, that file will be available as a template to start from.
This is also the ideal option for saving your preferred working settings. Event Template files save all the shortcuts including custom reports, plots, and so on. However, toolbar settings are not saved in template files since they are saved by the application.
A list of most recently opened template files appears under the heading Event Template on the Vivien Welcome window. The More... link will prompt you to open a template file from the Vivien Templates directory.
Vivien ships with several files that contain sets of pre-configured objects called “Insertables”. Insertables can be merged into your current file and inserted as needed. Vivien also allows you to create and save your own insertables.
If a part of your file has objects that you would like to reuse again, you can save it as an insertable. This is similar to merging one Vivien file into another one, but the insertable will be listed conveniently for you in the Insert Insertable dialog box.
Note: The object will be saved exactly as it appears in the file, with the same properties.
Result: The Save As window appears.

Result: The insertable will be saved. You can now insert it into any file from the Insertables... menu,
Result: The Insert Insertables window appears.
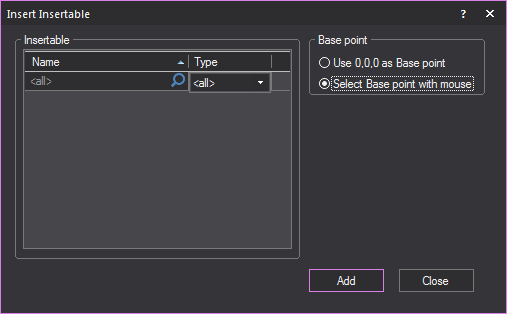
Result: The insertable will be inserted into the file.
Purge enables you to lower your file size by ridding the file of unused data such as old images, old renders, unused Layers, lighting positions, imported items from AutoCAD or SketchUp, and so on.
Note: Save your file before using the Purge command.
Note: Once you purge objects from your file, the action cannot be undone.
Result: The Purge window appears.
Note: The Purge window displays all of the items that could possibly be purged. If you do not have many purgeable items in your drawing, there won’t be many items listed. Purgeable items include: Layers, Images, Custom Library items, and All imported items.
Tip: You can double-click on an image item in the Purge window to see what that item is. Most of the time these images are Internal Renderings and other image objects that might be in your drawing, like old logos and plot images.
The Close command closes the current event document and returns you to the Welcome window.
Result: You are prompted to save changes to the current event document:
![]() © The CAST Group of Companies
Inc., 2004-2022 All rights reserved.
© The CAST Group of Companies
Inc., 2004-2022 All rights reserved.