
You add lights in drawing wireframe views and you customize their effects in lighting wireframe views. Although Lighting Wireframe views look a lot like drawing wireframe views, you cannot draw anything within lighting wireframe views—you can only select light fixtures and modify their settings. If you need to make changes to your drawing, you must switch to a drawing wireframe view.
Notes: You can also customize the lighting effects of fixtures in the Virtual View by using the Virtual View fixture selection mode. For details see “Using Virtual view fixture selection”.
Use the Light Tool to control the intensity, focus, zoom, color and projection pattern (gobo) of a light fixture. The Light Tool is available in the Lighting Wireframe, Lighting Quad, and Virtual View tabs. The Light Tool allows you to create virtual lighting Looks. You can rough-in static looks and render them for design presentations.
Note: You can also focus light beams in the Virtual View by using the Virtual View Fixture Selection Tool. For details, see “Using Virtual view fixture selection”.
Result: The beam displays.
Tips:
Note: When you focus a moving light, the fixture symbol does not rotate to align with the light beam in the wireframe or Virtual Views. However, the fixture does rotate in the rendered view.
In the Lighting Wireframe, Lighting Quad, and Virtual View tabs, from the Tools menu, choose Light Tool.
or
Click the Light Tool on the Lights toolbar.
![]() The Light Tool button.
The Light Tool button.
Begin by selecting the desired light fixtures in either the Lighting Wireframe, Lighting Quad tabs.
Note: To modify the fixture in the Virtual View, you must first select the applicable lights in either of the lighting tabs, and then switch to the Virtual View tab and continue with the Light Tool (step 2 below).
Result: Selected light fixtures highlight in green.
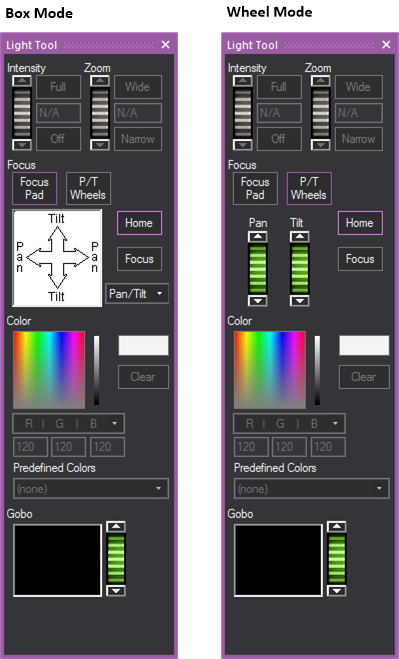
Use the Intensity options to set the intensity level for the selected lights. Higher levels represent brighter lights.
Note: The intensity level selected is applied to all selected light fixtures. When you select multiple light fixtures that have varying intensity levels, “N/A” displays in the Intensity box.
Use the Zoom options to set the diameter of the beam for the selected lights.
The Light Tool gives you the option to use it in either Box or Wheel mode.
Note: The Focus options do not take into account the current viewing position or light fixture settings. In one orientation, dragging to the right on the trackpad results in the beam moving left but rotating the light fixture 180 degrees and dragging to the right should cause the beam to move to the right.
Use these options to select the color of the selected light beams.
To facilitate designing with various fixtures using different color mixing techniques, the Color Designer tool also offers a drop-down with three different color space models (RGB, CMY, HSI). If you know the RGB values of the desired color, you can enter them, and the custom color box will update. Or if you have the RGB value and want to convert it to the CMY equivalent, change the Color Mixing selection.
You can also preview the color selected at all times using the Color preview box. Double-clicking on the Color Preview box has the same functionality as double-clicking on the Color Picker area, but without affecting your position on the area.
Note: These are valid value ranges for the color spaces:
To use one of the predefined colors that comes with Vivien, click the drop-down arrow beside the Predefined Colors drop-down box and select the color that you want to use for the currently selected light.
Gobos are patterns that the light fixture projects. Vivien contains a library of “stock” pattern lists. It also contains all custom patterns that you have imported with the Gobo Wizard.
You can use the Gobo Wizard to import custom images such as corporate logos, and then store them in the Gobos folder on the AV tab in Vivien’s library. Once they are stored in the library, you can apply these custom images to lighting fixtures that you have hung in your plot, personalizing your events and adding greater realism to your renderings. For details, see “Applying custom gobos to light fixtures”.
Custom gobos can only be created when a Vivien file is open, but may be saved for use in other files. A maximum of 12 gobos may be added to any Vivien file but there is no limit for how many can be saved for later use. When creating a custom gobo, you will be presented with the option to import a previously-saved gobo, or to create a new one.
Once you reach the file’s custom gobo limit, you must delete a gobo before you can create or import another. See “To delete custom gobos” for details.
To project a custom image upward, you can use Vivien’s Truss Wizard to create uplighting, and then apply a custom gobo to the light fixtures. For more information, see “Creating uplighting”.
Note that all custom gobos that you import are saved with your Vivien file. This means that when you share such a file with other Vivien users, your custom gobos will appear in that file’s AV > Gobos section of the Library Browser on the other user’s computer, and if selected for fixtures, will display in the Virtual View when those fixtures are on.
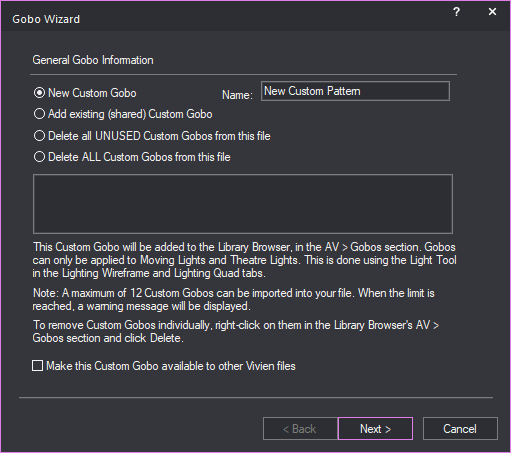
Note: Once a previously-saved gobo has been added to your file, it will no longer appear in the list.
Tip: To make this gobo available in other Vivien files, select the Make this custom gobo available to other Vivien files checkbox in this window; otherwise, the gobo will only be available in the current file.
Important Note: A custom gobo may only be made available to other files while it is being created. If the Make this custom gobo available to other Vivien files option was not enabled when the gobo was created but you wish to make the gobo available to other files later on, you will have to delete it and then add it again (this time remembering to enable this option).
Note: All colours and grays of the selected image will be projected by the fixture to which a custom gobo is applied. The white parts of the image (i.e. the pixels for which the R/G/B value is 255/255/255) will project the colour of the light (that is, the colour selected via the Light Tool, or white if no colour was selected) while he black parts of the image (i.e. the pixels for which the R/G/B value is 0/0/0) will block the beam.
Result: The gobo appears on the AV tab in Vivien’s library in the Gobos folder, or gobos are deleted. For details on applying custom gobos to light fixtures, see “Applying custom gobos to light fixtures”.
Custom gobos may be deleted from within the Gobo Wizard, from the Welcome Screen, or while the file is open.
Notes:
After you have created and saved custom gobos with the Gobo Wizard, you can apply them to Moving Lights and Theatre Lights that you have hung and turned on in your drawing. For details on creating custom gobos, see “To use the Gobo Wizard”.
Note: If the Light Tool is not displayed, click Tools > Light Tool.
Result: The gobo attaches to the light fixture and becomes visible in the Virtual View (if the light fixture is turned on).
Customize the properties of a fixture by assigning specific attributes, such as point of view, patch information, and lens type.
Tip: At any time, to access an object’s properties, you can click on the Item Properties tool on the Modify toolbar.
![]() The Item Properties button.
The Item Properties button.
Result: The Properties window appears. Based on the type of fixture that you have selected, the tab fields in the Properties window varies. An example is how in the graphic below.
Use the options on the Fixture tab to control the brightness of the fixture’s beam, footprint, or flare when turned on in Virtual View. The settings here will override the Virtual View > View Options settings.
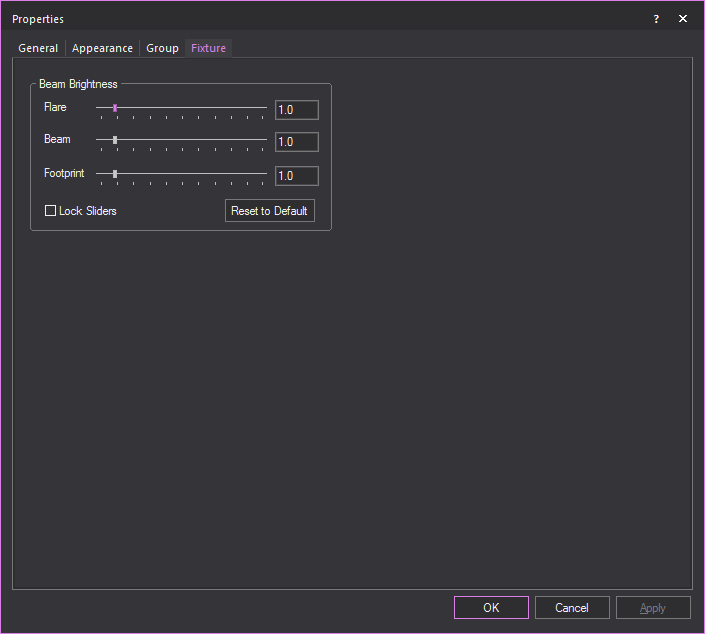
Note: Flare value is NOT passed to the Renderer when you use the Render Wizard to render the Virtual View.
Note: Beam value is passed and will apply to the Renderer when you use the Render Wizard to render the Virtual View.
Tip: If the beam of the fixture does not appear as bright in a rendering as you think it should be, increase the value of the Beam slider, keeping in mind the Beam Saturation setting in Step 4 of the Render Wizard.
Note: Footprint value is NOT passed to the Renderer when you use the Render Wizard to render the Virtual View.
Note: Any changes will be applied to all fixtures of this type in the file.
Changes made with the Light Tool update the currently selected Look. A Look is a saved lighting state—each Look remembers what settings (intensity, focus, color, gobo, zoom) were applied to the fixtures in your file—and can be recalled by simply clicking on its shortcut. Separate Looks may be created for various parts of the event; for example, the lights could be set a certain way while guests are arriving at the venue ("pre-show"), another way during dinner service, another way during a speech by someone standing at the podium, and yet another way while a band is performing.
The name of a Look should be indicative of which part of the show it represents. The name of the currently selected Look displays at the top of the working area. Before making changes, always check that the currently selected Look is the one you want to modify.
Tip: To build on an existing look without losing the original, clone the look shortcut and work from the copy of the shortcut. For more information on cloning shortcuts, see “To clone a shortcut”.
![]() © The CAST Group of Companies
Inc., 2004-2022 All rights reserved.
© The CAST Group of Companies
Inc., 2004-2022 All rights reserved.